Ben's kitchen / Chocolate Marshmallows
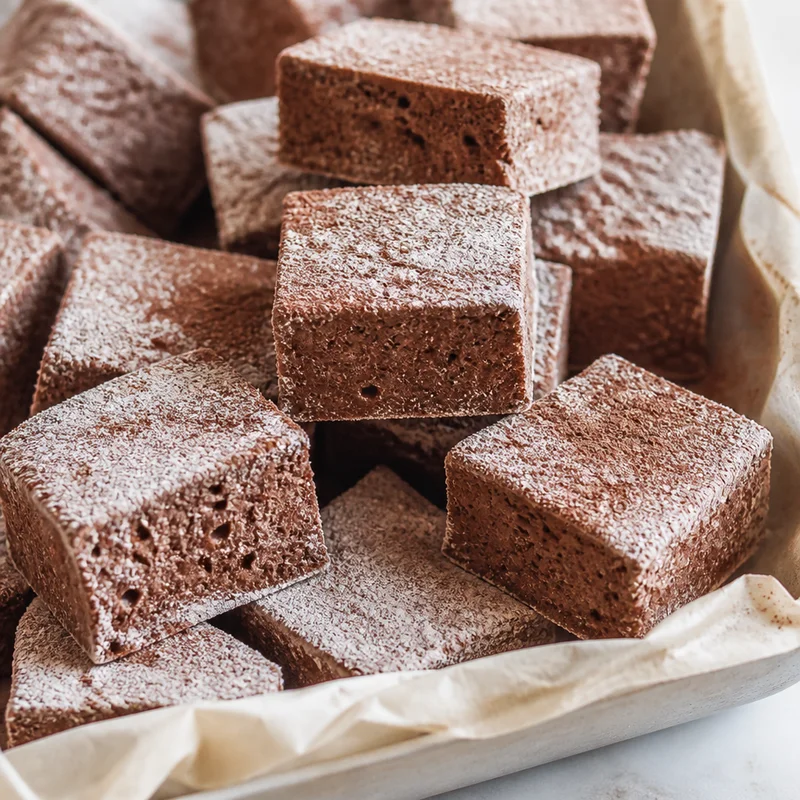
Chocolate Marshmallows
 Shared by Ben · with credit
Original recipe from sugarsaltmagic.com · shared with credit by Ben
Worked out from this recipe's ingredients. If you're cooking for an allergy, always read the full ingredient list.
Make pillowy chocolate treats that stay soft and chewy for days—the secret is whipping the mixture to just the right fluffy consistency before setting.
Ingredients
- 1 ½ cups cool water (, divided ½ cup:1cup (375ml))
- ¼ cup boiling water (, measure after it’s boiled)
- 35 g Dutch processed cocoa powder ((⅓ cup / 1 ¼oz))
- 1 ½ teaspoons vanilla extract
- 7 teaspoons powdered gelatine
- 465 g caster sugar (or white granulated sugar) ( (2 ⅓ cups / 16 ½oz))
- ¼ cup glucose syrup (or light corn syrup or golden syrup) ((60ml))
- 2 tablespoons icing sugar (powdered sugar)
- 2 tablespoons Dutch processed cocoa powder
Instructions
- Grease a 9 inch square baking pan with butter or coconut oil and set aside.
- Pour the ½ cup of measured water into the bowl of a stand mixer fitted with a whisk attachment, then pour in the gelatine powder. Give it a good mix to combine. Set aside.
- In a small bowl combine the ¼ cup of boiling water, the cocoa powder and vanilla. Mix well to a paste and set aside.
- Place the remaining 1 cup water, sugar and glucose into a medium, deep heavy-based non-reactive saucepan over medium heat. Attach a candy thermometer to the side of the pan.
- Stir the mixture gently until the sugar dissolves (try not to splash it up the sides of the pan). Once dissolved, stop stirring and turn the heat up to medium-high. Let it come to a rolling boil and continue boiling until it reaches 127C / 260F on the thermometer (after 10-15 minutes depending on the exact heat you're using).
- Take it off the heat. Let the bubbles start to subside for about 10-15 seconds then proceed immediately to the next step.
- Turn the mixer with the bloomed gelatin mixture on low. Slowly drizzle the sugar syrup into the mixer bowl, aiming to hit the side of the bowl but close to the gelatine mixture. The heat of the syrup will dissolve the gelatine.
- Once all the syrup is added, add the cocoa paste. It will be very liquid at this point so just whip on medium for 5 minutes, then turn the mixer up to high for a further 7-10 minutes.It should triple, or even quadruple in volume and turn light brown in colour. You'll know it's ready when you start to see strings of sticky marshmallow pulling away from the side of the bowl as it mixes. See the images in the post for the texture.
- Scrape the marshmallow into your prepared pan with a spatula. Use damp hands to gently flatten down the top and smooth it out. You can dampen your hands 2-3 times as needed but don't have them very wet. If you add too much moisture, the marshmallow can start to melt.
- In a small bowl combine the icing sugar and cocoa, then sprinkle a little over the top of the chocolate marshmallow reserving the rest in a sealed container for later.
- Cover the marshmallow pan (with another pan or a chopping board or book), then allow it to set in a cool place like the pantry (not the fridge) for at least 8 hours or overnight is better.
- When ready, turn the chocolate marshmallow out onto a sheet of baking paper - you can gently lift the corner of the marshmallow to release it and it should easily fall out of the pan. Sift over some of the cocoa sugar mixture, then use a sharp knife to slice it into squares. Sift over more of the cocoa sugar mixture as required, tossing the marshmallows in it to get them coated all over.
- Give your chocolate marshmallows a shake off before transferring to an airtight container. Store in the pantry – not in the fridge. They can keep for months stored properly.
- Please take a moment to leave a comment & rating. It's appreciated and so helpful.
Nutrition (per serving, estimated)
104calories
1gprotein
24gcarbs
1gfat
Estimates only — values vary with brands and portions.
Made with Sprig
Chocolate Marshmallows was created in Sprig — the AI chef that turns any craving into a complete recipe, plans your week, and shops with one smart list.
Free to start · 14-day Pro trial · cancel anytime
Not ready yet? Get the occasional recipe worth cooking — a couple a month at most.
You're on the list — check your inbox!
Unsubscribe anytime. Privacy Policy
More from Ben
Are you this recipe's original author or publisher? Report a problem